Drawcam Reference Guide v1.1.1
Drawcam is a simple program to use - see the 10 sec tutorial! It uses the metaphor of a digital camera - the user interface resembles the back of a modern digital camera, with a live preview/viewfinder screen, some controls and a prominent shutter button.
The Basics
Drawcam is an Android app that allows real-time modification of pictures coming from the device's camera. There are a range of filters available for adjusting the image - with a concentration on draw/art -type effects. The effects can be customized via up to 6 parameters, and these, too, can be adjusted interactively in real time. The range of adjustments is wide, and unusual and unexpected effects can often be found by using parameter values well away from the defaults. Once the shutter button is pressed the image is frozen and stored internally, and can be modified and saved repeatedly. As well as working with the live feed from the camera, Drawcam can also be used on imported images.

Live state
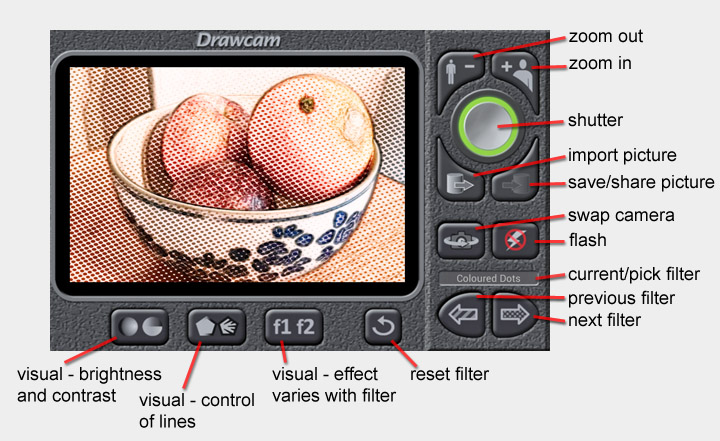
The image above shows Drawcam in its initial "live" state - the "viewfinder" is showing a filtered version of the live pictures coming from the camera. The prominent silver shutter button is surrounded by a green light, indicating that the app is in the live "go" state.
- In the live state the top two buttons allow zoom in and out (assuming the camera supports this, else disabled).
- The silver shutter button is large and prominent. It is surrounded by a "light" indicating the state of the app - green = live, amber = working, red = still image.
- The import button brings up a browsing dialog which allows you to bring any existing image on the device into Drawcam for manipulation.
- The save/share button is disabled in the live state.
- The swap camera button is active if the device has both a front and a back camera.
- The flash button is active if the current camera supports flash - for example a back -facing camera may, but the front-facing one may not. Generally there will be 3 modes available - flash off, flash always on or flash automatic.
- A small window shows the name of the current filter. You can click on this and get a list of filters to choose from. Note, any filter that you have decided to hide via the Menu option "Choose Filters..." will not appear in this list.
- The two buttons at the bottom allow you to change the current filter - next or previous, wrapping round at each end.
- Below the viewfinder is a set of buttons concerned with editing the current image/live view. Left - adjusts brightness and contrast, Centre adjusts line darkness and strength (generally) and Right depends on the current filter - it may change size of dots or texture, saturation, etc. Editing will be covered in the next section.
- The reset filter button restores the current filter (and hence image) to its default state.
Stopped State
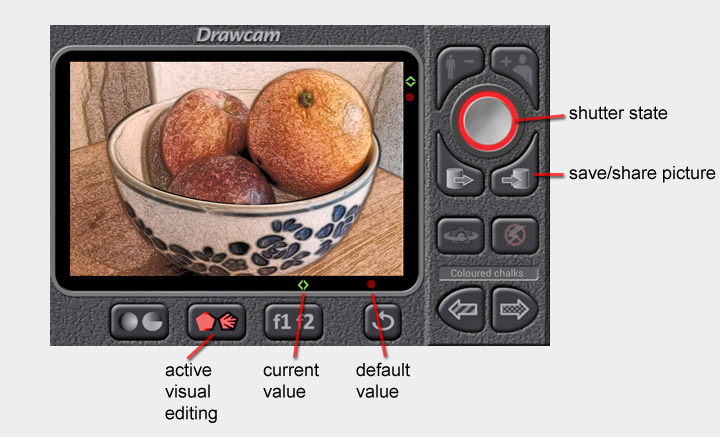
If the shutter has been pressed or an image has been imported the viewfinder will not show a live picture - the app is in the stopped state. The stopped state is indicated by the red light around the shutter button. (When you click the shutter to start taking a picture the shutter surround will be amber until the operation is complete.) You can return to the live state at any time by pressing the shutter button. You can also hit the device's "back" button. (A press on the back button in the live state will exit the app.)

- As you will see from the image above, in the stopped state some buttons become inactive - zoom in and out, camera swap and flash control.
- The save/share button is now active . You can save an image as many times as you want - it is given a unique name based on the current date and time. Saving is done by clicking on the button - sharing is achieved by holding down on this "button". This is described in more detail in "Sharing pictures", below.
- Pressing on any of the three editing buttons activates visual editing, and that button is highlighted in red. (A second press on the now active button will turn the editing back off.) When visual editing is on, two markers appear in the black surround of the viewfinder - a red dot indicating the default value, and a green arrow symbol indicating the current value. There are two independent pairs - horizontal and vertical. You change the value by dragging (or clicking) in the dark surround area. Once you start dragging there is no need to restrict your finger to the dark margin. Horizontal is for brightness, line darkness, factor 1. Vertical is for contrast, line effect strength and factor 2. Not all filters use all 6 parameters - if one is not used the corresponding icons will not appear in the viewfinder surround.
- At any time you can reset all of the editing values for the current filter back to their defaults by pressing the reset filter button. (You can adjust what the default values are via the "Save Filter" menu command.)
Please note, changing the current filter or adjusting filter parameters does not affect the image stored in the app - it is still in its original unfiltered state, so you can change each as many times as you want with no degradation in image quality. Simply save any variation on a picture that you like the look of by pressing the export/save button.
Sharing pictures
If you have a picture that you like you can save it at any time to your device's memory and gallery by clicking on the save/share button. If you want to share a picture at any time (whether or not you have saved it to your device) then you can do this as follows:

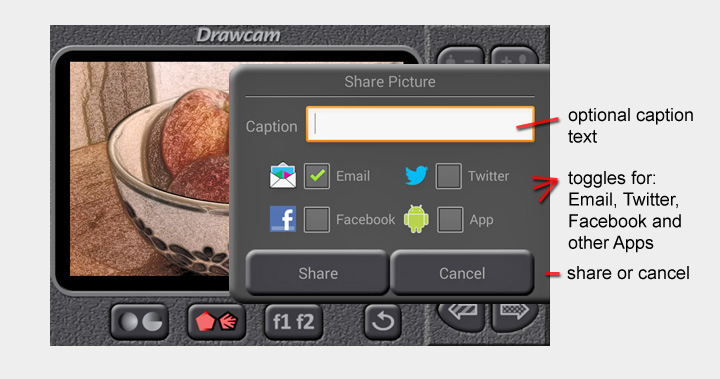
- If you click and hold on the save/share button, then after half a second a "Share Picture" panel will appear, as shown above.
- As this panel appears, the current picture is saved temporarily (it will be deleted the next time Drawcam starts up). The size of this image and whether it is lightened are determined by Preferences (explained below).
- At present sharing can be to one of four destinations - email, Twitter, Facebook, or to another android App on the device. You choose the sharing destination by clicking on the corresponding toggle button - you can select 1 or more.
- Depending on the destination, a fixed text message will also be shared, but you can add in optional text by clicking on and then typing into the Caption field.
- Click on the Share button to start the share process, which can take several seconds depending on the destination(s) chosen.
- In the case of "email" and "App", there may well be more than one possible program that can handle the request - if so you will be presented with a dialog from which to make your choice.
- You will be presented with any dialogs peculiar to your share destination choices - for example, the first time you attempt to use Twitter a standard log-in dialog will be shown.
- Please note that some of these sharing destinations have rules about how frequently you can share images, and they can also be overly zealous in preventing the posting of what they see as "duplicate" messages.
Menu Options
Clicking on your device's menu button will present you with a standard menu.
- Preferences. This option is described in full detail below.
- Choose Filters... This presents you with a list of all the available filters in Drawcam. You can decide to hide any you don't wish to use by unchecking the appropriate item. Dismiss the list by clicking elsewhere on the screen or by using your device's "back" button.
- Save Filter. This saves the current visual editing settings for the current filter. These settings will now become the new defaults for that filter. You can thus adjust any filter to be the way you want.
- Reset Filter This will appear only if the current filter has had its defaults overridden by a Save Filter command. The current filter will have its various visual editing parameters set to the factory values.
- Send to Drawcam. This takes the current image, as it appears in the screen and passes it back into Drawcam so that multiple passes can be done. It is a convenience command for doing a Share Picture to App, then choosing "Drawcam". It also has the advantage of ignoring the Picture Sharing preferences described below - the full size image is exported and the image is not brightened at all.
- About... This brings up a small window showing the version of Drawcam installed. The window disappears automatically.
Preferences
If you click on your device's menu button you will be able to bring up a Preferences dialog. This is a completely standard Android GUI element so no attempt will be made to explain how to use it. This section describes the meaning of the available Preference options for Drawcam.
Camera
- auto-focus - a toggle to indicate whether the camera should try to auto-focus when the shutter button is pressed. Default: on.
- auto-save picture - a toggle to determine whether the picture is saved to your device every time the shutter is pressed. Default: on.
- Shutter noise - a toggle to determine whether a camera shutter-like noise is played when the shutter button is pressed. Default: on.
- Fix preview zoom. In some devices (Nexus 4, front camera, for example) the zoom buttons seem to have no effect on the live preview, yet do work when you take a picture. This toggle can turn on a fix for this. Default: off.
- Larger image files - a toggle to determine whether standard size images or larger ones are produced. The actual size of "standard" and "larger" varies depending on the capabilities of your device. Some older/lower spec devices may not allow setting this option. Larger images will, of course, slow down "save" (and possibly "share") operations. Default: off
Strokes
- Select if diagonal strokes look inverted - a toggle which controls the direction of strokes drawn in the stroke-based filters (Oils, Sanguine Lines, Colour Etching etc.) If the stroke lines look strange at edges - especially those running diagonally (as in the image on the left, below), then try changing the value of this preference. Default: off "Normal strokes".

Front Camera
- Invert front camera - this toggle determines whether the front camera should be flipped top-to-bottom, to cater for some devices where the preview and picture from the (optional) front camera can appear inverted. Default: off.
- Handling of rotated front camera. In some devices the front camera is rotated relative to the normal orientation of the camera app. In this case, a portrait-shaped picture has to be fitted to a landscape-shaped screen. There are two options - the camera image can be zoomed in so that the central portion is shown, or the entire image can be shrunk down and shown. Default: zoom.
Picture Sharing
- Shared picture max dimension. This determines what is the maximum size in pixels of the longer side of a picture when it is sent from Drawcam for "sharing". The values allowed are 400, 600, 800, 1000, 1200, or "Full Size". The larger the size chosen, the slower the share operation will be. Default: 800.
- Shared picture brightening. The screen on a mobile device is usually back-lit and is particularly bright and vibrant compared to most computer screens. When a picture is sent out from Drawcam for sharing it can sometimes look rather dark when viewed on a computer monitor in Twitter, for example. This option controls the level of shared picture lightening. Values: None, Mild, Medium, Strong. Default: Mild.

