
Editing
When you create the first source there will be a fairly dramatic change to the display, as can be seen in this screenshot.
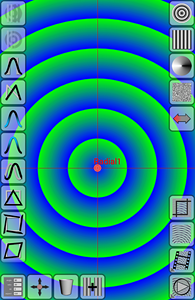 The most obvious change, of course, is the newly created source drawn in the work area. Each new source is given a name - its type plus an increasing number - Radial1, Linear 2, Radial 3, etc. If you wish, you can rename any source via the Properties dialog.
The icon and the name of the selected source will be in red and there will be a crosshair shown. This can prove useful when setting the relative position of sources.
An important change is the appearance of two new palettes of buttons. At the bottom is the Edit palette and down the left edge is the Visual Edit palette. These palettes appear only when a source is selected.
Selection: When a new source is created it is automatically selected, with its icon and name in red, and the selection causes the two editing palettes to appear. When you have more than one source the question of selecting the one to work on becomes relevant. You can select any source on the screen by briefly clicking on it with your finger.
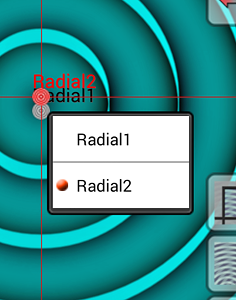 If the click is ambiguous because sources are close together or even on top of one another, then a popup menu will be shown for you to indicate which source you want to select.
If, for some reason, you want to select nothing (causing the edit palettes to disappear) then simply do a long click on the screen away from any source. (Changed to long click in v1.3.)
If you hold your finger on an empty piece of screen and drag then you will scroll the screen. To return to the initial position, tap on an empty piece of screen.
As it can be awkward to have to scroll the screen around to reach sources for selection that are out of view, the crop screen also allows selection. This is described later.
Edit Palette
The edit palette at the bottom of the screen is shown below. This palette appears only when a source is selected.
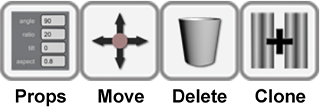
- The Properties button brings up the properties dialog. This is described in greater detail below.
- To re-position a source you can simply press on its icon and drag it to a new position. However, when sources are too close together or awkwardly placed, the move button should be clicked. You can then drag the selected source by dragging from any starting point on the screen.
- The delete button simply deletes the current source. Like all of the buttons here, this can be undone via the undo button.
- The clone button creates an exact copy of the current source, with only the name changed. (The mode will be changed if cloning the lowest source.)
Properties dialog
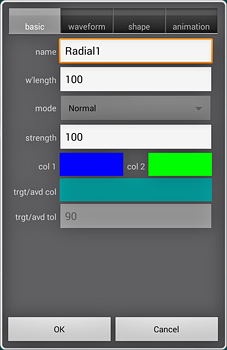 When you click on the properties button you are presented with a tabbed dialog box similar to that shown to the left. (The precise contents vary with the type of source selected.)
There are a large number of properties associated with even the simpler types of source and so the dialog is split into a number of tabs.
- basic contains the most useful properties - wavelength, colours, mode. Mode refers to the way this source interacts with those already created before it. The lowest source is fixed as “ Normal" mode. There are some modes which act like mixing paint - "darken" and "multiply", so that the combination is always darker than the individuals, red and green give a very dark neutral. There are others which act like mixing light - "lighten" and "screen" - the combination is always lighter than the individuals, red and green give yellow. Much of the power of Sources comes from the large number of modes available.
- waveform contains the properties for the waveform - its type, ratio, etc. Ratio refers to the relative amounts of low and high in a waveform. A sine wave is always symmetrical, but a rectangular or triangular waveform can be "biased" - a large ratio means more of the low colour part.
- shape tab contains the properties affecting the overall shape - angle, aspect ratio. Radial sources also allow you to control the overall "shape" - the number of sides in the created rings.
- animation tab contains the properties concerned with "movement" - the phase, the relative speed, etc. Phase is an important control even in still pictures - it sets the starting point in the waveform cycle for a static source.
The numeric fields deserve special attention. They are not altered via a keyboard, but rather by dragging your finger.
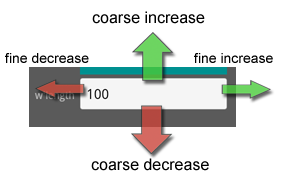
Touch inside a numeric field with your finger then drag to change the value. Up and down change the value rapidly, left and right change the value slowly.
Colour editing
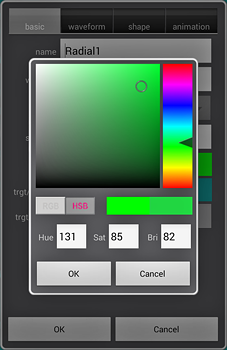 If you click on one of the two colour swatches you will be presented with the colour picker dialog, shown right.
Colours can be chosen in RGB or HSB mode. HSB is the more useful. The mode is chosen by clicking on the toggle control.
The large colour square allows you to choose the saturation and the brightness of a given hue. Simply drag/click where you want within this square. The hue is chosen by dragging/clicking on the rectangular chooser on the right.
The corresponding HSB or RGB numeric values are shown in the numeric fields. These can be adjusted directly by dragging with your finger. The pair of colour swatches shows the original colour on entry to the dialog on the left, and the currently picked colour on the right.
