Getting Started
When you start up Sources (after the splash screen has gone) the screen will be as in the image below. (Note that the program works in either landscape or portrait orientation and you can switch whenever you want simply by rotating your device.)

The screen consists of a black work area, and a set of buttons to the right, arranged in two palettes.
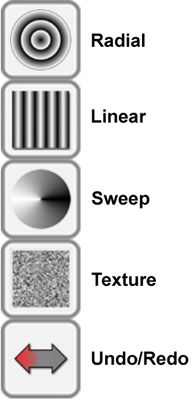
The top buttons are for creating sources (plus undo/redo).
The lower buttons are for producing pictures and animations.
You will either want to open an existing definition via the Options menu (described later) or else create at least once source.
Creating Sources

There are two ways to create using the sources buttons.
- The normal way is to press on the desired button and then drag the source to where it is required and then lift your finger from the screen. This will create a standard source (with blue and green colours , wavelength of 100, phase of 0 etc).
- If, however, you click on a source button a new source will be created with semi-random values for all of its parameters - position, colours etc.
Types of sources:
- radial - waves radiating out from the source position.
- linear - waves originating in a straight line from the source, taking into account the angle of the source. The default angle of 0 gives waves moving to the right. Linear (and texture) sources can be “double-sided” – these move out from the source in both left and right directions. “Sidedness” is controlled in the properties dialog described later.
- sweep - the waveform is 'smeared' round the source. Wavelength is irrelevant.
- texture - like a linear source, but the 'waveform' is one of several provided bitmaps. The size of the bitmaps is determined by the wavelength. Most useful not moving – their default state.
Note that the 'random' creation of sources by clicking can sometimes provide an interesting starting point for building up an image (unusual colour combinations especially), but the chances of producing an interesting picture by working purely randomly must be low.
Undo/redo
The undo/redo button is placed at the end of the create palette so that it is always available, and is in a prominent position on the screen.
Sources supports multi-level undo/redo. You can undo the last action (changes of attributes, creation, deletion, clearing, moving, pinning, cropping) by clicking on the undo button. The last operation undone can be redone by clicking the same button - so you can toggle back and forward seeing the effect of the latest change. To access the other operations available you drag from the undo button. Drag to the right, or upwards, will redo the next available operation. A drag to the left, or downwards, will undo the next available operation. In SourcesPro there are up to 40 operations stored in undo/redo, in SourcesLite it is limited to 3.
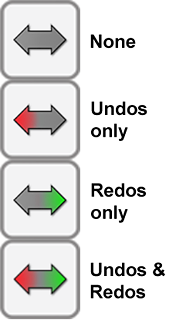
 The graphic on the undo/redo button tells you the state of the operations available.
If the button is all grey, there are no operations to redo or to undo. This would be the initial state of the app.
A red arrow to the left indicates that 1 or more undo-able operations are available, but no redos.
A green arrow to the right indicates that 1 or more redo-able operations are available, but none for undo.
If both the red and green arrows are lit then there are undo-able and also re-doable operations available.

