
Render Palette
The last palette to consider is the render palette, always available at the bottom right of the screen.
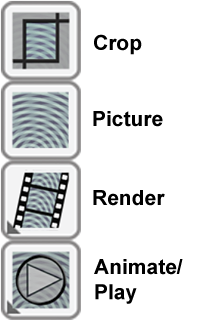
- The top button is the Crop button - not strictly part of rendering but having an important part to play in the appearance of any images created. The process of cropping will be described below.
- The Picture button allows you to see the current picture with no palettes, icons or highlighting in the way. In addition, by default the rendering is to a higher standard than in the general display, so that many artefacts will disappear. The quality of the picture display is controlled in the Preferences. A long click on a rendered picture will return you to normal mode. A short click will bring up a couple of buttons - "Done" to exit picture mode, and "Save" to export the current picture. Click Save and you will be presented with the export dialog - shown below to the right.
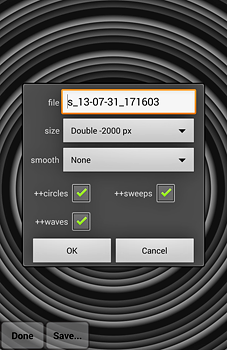 A filename will already be filled in for you, indicating "now", but you can change this as you wish. The image will have a title of the name of the current definition (or just its filename if the current definition has not yet been saved) so that you can relate it back to the definition used to create it.
 The important thing to note is that you can alter the size and quality of the saved image. Picture sizes vary from 100 pixels up to 1000 to 4000, (the upper limit depending on the amount of internal memory in the Android device). In SourcesLite the image is restricted to screen size or 750 pixels, whichever is smaller.
The tick boxes cover the various drawing optimizations which can be applied - each one may slow the render process to some extent. Drawing optimizations are not available in SourcesLite.
A brief indication of what the various optimizations do:
++circles. There are two "circle" shapes available for radial sources - there is a quicker circle36 which always has exactly 36 sides, and a better "circle" which has 90 sides normally, or 360 if this option is selected. The more sides there are in a radial source the slower it will be to render. (On decent modern devices this is not really an issue.) Also note, if you have used a high tilt to produce a star like shape with a "circle" then the picture will look very different depending on whether you have this option selected.
++sweeps. In preferences there is an option for “Smoother sweeps”. These produce the best results but are noticeable slower than normal sweeps. When normal sweeps are being used this optimization option switches between 720 and 3600 sides for the sweep render. In “smoother” mode a much smaller change will be seen when toggling this option.
++waves – this switches on improved handling of sources at low scales – rather than dissolving into strange patterns this optimization should lead to uniform colour instead. Of course, if you like the effect of having one or more optimizations turned off you can always render and export the image like that.
smooth. In addition, SourcesPro supports 4 levels of smoothing via the pull-down menu. Normally smoothing is unnecessary, but on occasion some jaggedness may appear at the edges between sides of radial sources. Smoothing simply applies a weak blur filter, with three different strengths. Often, a better solution is simply to render the picture at a bigger size then scale it down outside the app – this also leads to smoother images. Smoothing is not available in SourcesLite.
When you click OK, the picture will be re-rendered at the chosen size and quality, before being saved. It will also be inserted into the Android Gallery. Note that large images or high qualities can lead to render times of the order of a few minutes. Notifications will be shown to indicate that the program is actually working on your request. At present, it is important to let the render, compress and save process complete before exiting or switching away from the app. The image will be available in your gallery app. Images are saved using lossless compression for the highest quality. If the image looks rough/blocky in the gallery it has either been saved at a small size or else the gallery caching process has not yet caught up with the new file.
If you wish to access the images on your device (to copy to a PC, say), mount it via USB/wireless as instructed in your manual and you will find the images in /SourcesPro (or /SourcesLite). There is a bug in Android 4+ where sometimes new files do not show up when browsing via USB. If this happens the only solution at the moment appears to be rebooting the device.
- The Render button creates an animation sequence by advancing the phases of all the sources, one frame at a time and saves the result into a file on the Android device storage. This is intended more for fun than anything serious, and although you can control the size and quality of the frames, you cannot give the animation file a name - there is one only. If you click on the button then rendering will begin, with an indication on the screen of the current frame number. If frame 100 is reached the process will pause and you will be shown two buttons. If you click on the screen before it pauses automatically the process will also pause and present the buttons. "Done" finishes the process and takes you back to the normal display, "Cont"(inue) resumes with an additional 100 frames. Exporting of animations will be looked at for the next major release.
- The Animate button simply attempts to do a real-time animation as near to the target of 30 frames per second as it can manage. Animation is generally done at a lower quality/size than the Render process and is a quick way of moving all of your sources through their cycles seeing how they interact at various phases. If you have already done a proper Render on the current scene then clicking this button will replay the prepared animation, and it will attempt to get as close to 30 fps as it can manage. If you render an animation at a large size then the Android device may be physically incapable of moving the data from storage to the screen quickly enough to get the full frame rate. If this proves the case you must re-render with a lower image size. At any time you can click on the animation screen and you will be presented with a number of buttons, as shown below.
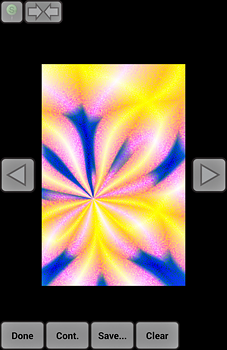
- The green "pin" button allows you to set the current position in the playback as the starting point for the underlying scene. Thus, you can animate a scene, see a point you like, stop the animation and set that as the new base state.
- The top arrows button is seen only when playing back a rendered animation. It controls the looping behaviour - it cycles round the three values as you click it: "forward and stop", "forward and repeat from start" and "reverse direction at end of animation".
- The two arrow buttons at either side of the screen allow you to step through the animation one frame at a time. If you are stepping through a rendered animation then you can't go past the start or the end. In contrast, if you are stepping through an on-the-fly animation then you can go backwards past the start point or as far forwards as you want. At any time, if you like the position, you can "pin" the scene to that point, or save a picture.
- At the bottom are some buttons - "Done" to exit to the normal screen, "Cont"(inue) to continue with the animation/playback, "Save…" to get an image parameters dialog as above to save a picture. If you are replaying a rendered animation then there will also be a "Clear" button to discard the saved animation and allow you to do an on-the-fly animation.
Note, both the Render and Animate buttons have an arrow at their bottom left corner. This is to indicate that a long click on either button will bring up a configuration screen (like the one above, but with the filename field replaced by a numeric speed field) to allow you to configure size, quality and speed. By default, rendering and animation run with a reduced size to get the best performance.
Cropping
 When you click on the Crop button in the render palette you will be shown a display similar to that on the left. The entire scene will be shown in miniature*, with the outline of the current crop settings shown in red. Initially, this will be full height, or full width if in landscape orientation. You adjust the cropping by dragging with your finger. If you touch near one of the corners and drag, the red frame will resize at that corner. Dragging from anywhere else will cause the frame to move.
The current crop bounds rectangle also contains faint guide lines at half and third positions to act as aids for composition.
*In fact, the image extends to the full size of the crop screen, but the crop frame will be unable to move beyond its normal square bounds. The inaccessible areas will be shown dimmed. In addition, the working area outside of the current crop rectangle will also be dimmed a little.There are five buttons on the screen:
- OK to confirm the changes.
- Cancel to abandon any changes
- Clear to reset the cropping to its default (full height or width) state.
Pressing any of these three buttons will return the program to the normal screen.
- A zoom out button marked “-“ and
- A zoom in button marked “+”.
The zoom buttons are provided so that you can have greater control over cropping. Zooming in will centre the display on the current crop area. You can zoom in so far that the crop frame may no longer be visible, but whenever you re-enter the crop screen the magnification will be reduced (if necessary) such that the entire crop frame is visible. If you are fully zoomed-in or zoomed-out the corresponding button will be disabled.
In addition, the crop screen can be used for selecting sources. The crop screen gives an overview of the entire workspace – the normal working area display may well have sources situated off-screen. To select on the crop screen simply click on the desired source. As usual, if the selection is ambiguous you will be presented with a menu of possibles to choose from. You cannot unselect in the crop screen. Selection is not affected by which button is used to dismiss the screen – you can select and hit cancel to be guaranteed to have performed only a selection with no change to the crop bounds.
